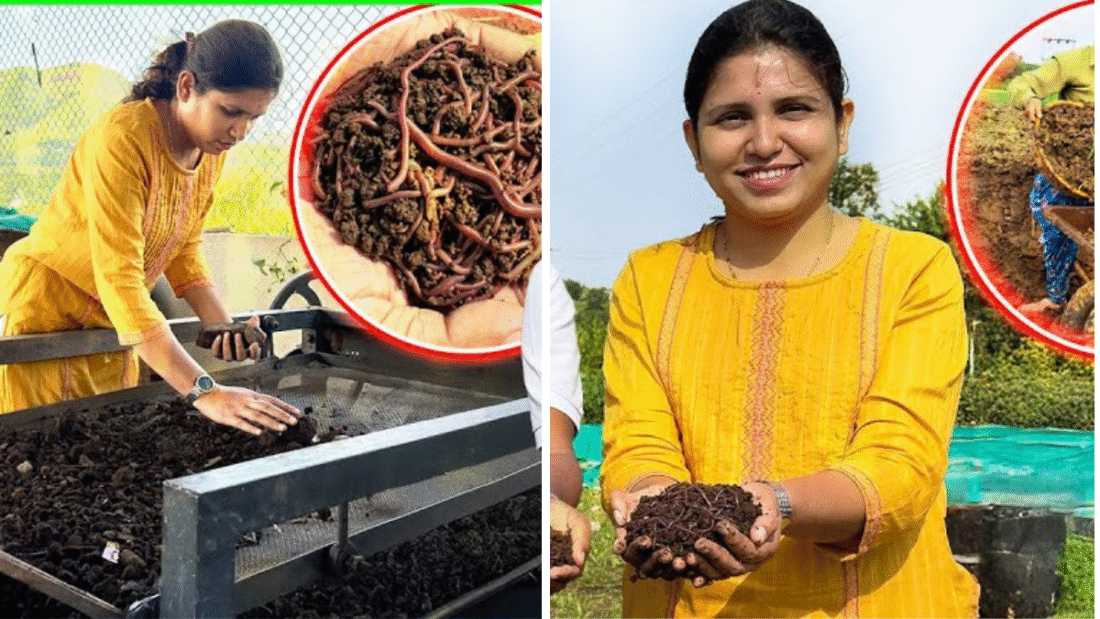
I Stopped Using Fabric Softener and Switched to Vinegar — Now My Towels Are Fluffier, Fresher, and Softer Than Ever

I Stopped Using Fabric Softener and Switched to Vinegar — Now My Towels Are Fluffier, Fresher, and Softer Than Ever

There’s something deeply satisfying about pulling freshly laundered towels from the dryer — that cozy, warm softness that makes even a simple shower feel like a spa experience. But lately, mine were coming out stiff, coated, and oddly less absorbent. For years, I used liquid fabric softener, thinking it was the secret to soft, fresh laundry. Then, one day, I stumbled across an old-fashioned cleaning tip: replace your fabric softener with plain white vinegar.

It sounded ridiculous at first — vinegar? The stuff that smells like pickles? But curiosity won. I tried it once, and the results completely surprised me. Not only did my towels feel softer and fluffier, but that funky, “old towel” smell disappeared completely. Now I’m never going back. Here’s exactly why this simple swap works, how to do it right, and why vinegar deserves a spot in every laundry room.


Why I Ditched Fabric Softener in the First Place

For years, I thought liquid fabric softener was an essential part of doing laundry — especially for towels. The commercials promised soft, fragrant fabrics that felt luxurious against the skin. But over time, I noticed the opposite happening.

My towels were losing their absorbency. They didn’t dry me off properly anymore, and sometimes they even came out of the wash smelling musty. No amount of detergent seemed to fix it. That’s when I learned what many people don’t realize: fabric softener leaves behind a waxy residue.

This residue coats fibers, making them feel smooth at first but actually trapping detergent, body oils, and mildew over time. The result? Towels that get less clean, less fluffy, and less fresh with every wash. That buildup also makes fabrics less breathable — not great for clothes, and terrible for towels that are supposed to absorb moisture.

So I decided to skip the softener altogether — and that’s when vinegar came into the picture.


The Surprising Science Behind Vinegar in Laundry

White distilled vinegar is one of the most versatile natural cleaners around, and it’s especially effective in laundry because of its acidity.

Vinegar’s mild acetic acid helps:

  • Break down detergent residue and softener buildup.
  • Dissolve minerals from hard water that make towels stiff.
  • Neutralize odors caused by bacteria and mildew.
  • Restore the natural fluff and absorbency of towel fibers.

What’s even better? Vinegar doesn’t leave any lingering smell once the towels are dry. It evaporates completely, taking unwanted odors with it. And because it’s gentle, vinegar doesn’t damage fabrics, colors, or your washing machine — unlike some harsh commercial products.


How I Use Vinegar in My Laundry Routine

Switching to vinegar was much easier than I expected. Here’s how I do it step by step:

1. Add Vinegar to the Rinse Cycle

Instead of fabric softener, I pour about ½ to 1 cup of white distilled vinegar into the fabric softener compartment or directly during the rinse cycle.
This ensures it’s evenly distributed and helps break down any leftover detergent from the wash.

2. Wash as Usual

I use my regular mild detergent (preferably unscented), and wash my towels in warm or hot water depending on their fabric type. Vinegar enhances the detergent’s effectiveness by preventing mineral buildup.

3. Dry Completely

I tumble dry my towels on medium heat. Once dry, they feel noticeably lighter, softer, and fresher — without any chemical coating.

Optional: Add Baking Soda for Extra Freshness

About once a month, I’ll do a deep clean by adding ½ cup of baking soda to the wash cycle and vinegar to the rinse. This combo removes deep odors and residues even more effectively.


The Results: Fluffier Towels That Smell Naturally Fresh

After my first “vinegar wash,” I noticed the difference right away. My towels fluffed up in the dryer like new, and they had that clean, neutral smell — not the perfumed scent of fabric softener, but a natural freshness that felt pure.

Even better, my towels absorbed water again like they were supposed to. That waxy, slick feeling was gone. Over the next few weeks, I repeated the vinegar rinse and noticed that my washing machine smelled cleaner too — a bonus I hadn’t expected.

Now, months later, my towels still feel brand new. They dry faster, don’t carry mildew odors, and don’t get stiff, even when line-dried. I honestly wish I’d made the switch sooner.


Common Questions About Using Vinegar in Laundry

1. Will my laundry smell like vinegar?
No! Once the clothes or towels are dry, the vinegar smell completely disappears. It only lingers for a few minutes during washing.

2. Can vinegar damage my washing machine?
Quite the opposite — vinegar actually helps clean and descale your washing machine’s drum and hoses. It prevents detergent buildup and mold in front-loaders.

3. Is vinegar safe for all fabrics?
White vinegar is safe for most fabrics except delicate items like silk or some synthetics. Always check care labels to be sure.

4. Can I still use dryer sheets?
You can, but I prefer skipping them too. Dryer sheets can also leave residue. Instead, I toss in wool dryer balls for extra softness and quicker drying.


Eco-Friendly Benefits of This Simple Swap

Aside from the impressive results, I love that this switch also makes my laundry routine more eco-friendly. Commercial fabric softeners often contain chemicals, artificial fragrances, and microplastics that end up in wastewater.

Vinegar, on the other hand, is biodegradable, non-toxic, and safe for septic systems. It’s a natural alternative that’s better for your health, your home, and the planet. Plus, it comes in a recyclable bottle and costs a fraction of what softeners do — saving both money and waste.


My Favorite Vinegar Laundry Hacks

Once I saw how well vinegar worked on towels, I started using it in other parts of my laundry routine too:

  • For workout clothes: Vinegar helps eliminate stubborn sweat odors.
  • For baby clothes: It softens fabrics naturally without any harsh chemicals.
  • For whites: A splash of vinegar brightens fabrics by removing dull detergent buildup.
  • For pet blankets: It neutralizes pet odors better than most commercial sprays.

It’s one of those rare cleaning staples that’s truly multipurpose — simple, cheap, and effective.


Final Thoughts: The Power of Simple Solutions

It’s easy to assume that modern, scented, high-tech products are better — but sometimes, the simplest household ingredients turn out to be the most effective. Vinegar reminded me of that.

By swapping out my chemical softeners for this humble kitchen staple, I not only restored my towels’ softness and absorbency but also cut down on unnecessary waste and artificial fragrance in my home.

So, if you’ve been struggling with stiff or smelly towels, try washing them with vinegar once. You’ll likely be just as shocked as I was at how clean, soft, and fluffy they turn out. Sometimes, grandma’s tricks really do outshine modern solutions — one laundry load at a time.

I Put a Bowl of Vinegar in My Kitchen Overnight — And the Odor Disappeared by Morning

I Put a Bowl of Vinegar in My Kitchen Overnight — And the Odor Disappeared by Morning

You know that lingering kitchen smell — the one that clings even after you’ve done the dishes, taken out the trash, and wiped down every surface? No matter how many candles you light or how much air freshener you spray, it just won’t go away. For me, it was the stubborn scent of last night’s fried food that seemed to hang in the air for days.

I had tried everything — scented sprays, baking soda boxes, even boiling lemon peels. Nothing truly neutralized the smell. Then I came across an odd-sounding trick online: “Put a bowl of vinegar in your kitchen overnight.”

Honestly, I was skeptical. Vinegar has a sharp, sour smell of its own, so how could it possibly remove other odors? But curiosity got the better of me, and I decided to give it a try.

The next morning, I walked into my kitchen expecting the usual stale smell — and was stunned. The air felt cleaner, fresher, and somehow lighter. There was no sign of that greasy, lingering odor — not even a hint. That’s when I realized this wasn’t just a fluke; vinegar is one of the most powerful natural odor neutralizers you can use in your home.

Here’s exactly why it works, how to use it effectively, and how this simple trick can transform the smell of your entire house overnight.


Why Vinegar Works So Well on Odors

Most air fresheners and candles don’t actually eliminate smells — they just mask them temporarily. Once the scent fades, the original odor comes right back. Vinegar, on the other hand, works differently.

1. The Science Behind It

Vinegar (specifically white distilled vinegar) contains acetic acid, which neutralizes alkaline odors. Many bad smells — like fish, smoke, grease, or food waste — are alkaline in nature. When acetic acid molecules in vinegar come into contact with these odor particles, they chemically neutralize them rather than just covering them up.

In other words, vinegar doesn’t just make the air smell better — it actually cleans the air by breaking down odor molecules.

2. It Absorbs and Balances Odors Naturally

Vinegar acts like a sponge for bad smells. As it evaporates into the air, it binds with airborne odor particles and neutralizes them. The strong vinegar scent you notice at first fades quickly as it does its job — and what’s left behind is neutral, fresh air.


My Overnight Vinegar Experiment

Here’s exactly what I did the night I tried it — and how you can replicate it in your own home.

Step 1: Choose the Right Vinegar

Always use white distilled vinegar for odor removal. It’s colorless, inexpensive, and contains the perfect level of acetic acid (around 5%) to tackle stubborn smells. Avoid apple cider vinegar or wine vinegar — they have stronger scents that can linger.

Step 2: Pick the Right Bowl or Container

I used a medium-sized glass bowl, though a ceramic one works too. Avoid plastic since vinegar can sometimes react with it. You don’t need to fill the bowl completely — about one cup of vinegar is plenty for an average-sized kitchen.

Step 3: Place It Strategically

Set the bowl on your kitchen counter, near the source of the odor if possible — like close to the stove, trash can, or sink. If you cooked something especially strong (like fish or curry), you can even place two bowls in different corners of the room.

Step 4: Leave It Overnight

Let the vinegar sit out for 6–8 hours (overnight is ideal). During this time, the vinegar molecules circulate through the air, trapping and neutralizing unwanted odors.

Step 5: Wake Up to Fresh Air

By morning, the harsh vinegar scent will have faded, taking the bad smells along with it. You’ll be left with a kitchen that smells crisp, clean, and surprisingly neutral.


Why It’s Better Than Air Fresheners

After seeing how well this worked, I realized why store-bought sprays had always disappointed me.

1. They Mask Instead of Removing

Most air fresheners contain synthetic fragrances that simply cover up odors. They don’t tackle the root cause, so the bad smell returns once the scent wears off.

2. Vinegar is Chemical-Free and Safe

White vinegar is non-toxic, biodegradable, and safe around children and pets. You don’t have to worry about inhaling artificial perfumes or releasing chemicals into the air.

3. It’s Incredibly Affordable

A gallon of vinegar costs less than most name-brand air fresheners and lasts for months. One cup is all you need to freshen an entire kitchen.

4. It Works on Multiple Odors

Vinegar isn’t picky — it neutralizes odors from:

  • Cooked fish, garlic, or curry
  • Trash bins or compost buckets
  • Smoke or burnt food
  • Pet smells
  • Musty pantries or cabinets

It’s basically a one-ingredient miracle.


Other Ways to Use Vinegar for Odor Control

Once I discovered how well this trick worked in my kitchen, I started using vinegar in other parts of my home — and the results were just as impressive.

1. Microwave Refresh

If your microwave smells like popcorn or burnt leftovers, place a bowl with equal parts vinegar and water inside. Heat for 2–3 minutes, then wipe down. The steam loosens grime and removes odors instantly.

2. Fridge Freshener

Leave a small open bowl of vinegar in your refrigerator overnight. It absorbs food odors without leaving any scent behind. You can also wipe shelves with a vinegar-and-water mix to keep it smelling fresh.

3. Garbage Can Deodorizer

Soak a paper towel or small sponge in vinegar and place it at the bottom of your trash bin for a few hours (or overnight). It neutralizes sour or rotten smells fast.

4. Laundry Room Fix

If your washing machine or laundry basket smells musty, run an empty wash cycle with one cup of vinegar or leave a bowl of vinegar nearby to freshen the air.

5. Pet Area Refresher

Spray diluted vinegar (1:1 vinegar and water) on pet beds, litter box areas, or carpets where odors linger. It kills bacteria and removes the scent naturally.


The Do’s and Don’ts of Using Vinegar for Odors

While vinegar is incredibly versatile, a few simple tips can help you use it more effectively:

Do:

  • Use white distilled vinegar — it’s the cleanest and least likely to leave a smell.
  • Place bowls in open areas with good air circulation.
  • Leave it overnight or up to 24 hours for strong odors.
  • Replace the vinegar every few days if needed.

Don’t:

  • Mix vinegar with bleach or ammonia — this creates toxic fumes.
  • Use on marble or stone countertops — vinegar can erode the surface.
  • Leave bowls near metal appliances — prolonged contact may cause corrosion.

Why Vinegar Smell Doesn’t Linger

A lot of people worry that using vinegar will make their house smell like a salad dressing. The truth is, vinegar’s scent fades surprisingly fast.

Within an hour or two, it evaporates completely, taking the bad odors with it. If you’re sensitive to the smell, you can add a few drops of essential oil (like lemon, lavender, or eucalyptus) to the vinegar. That way, you’ll get a light, pleasant fragrance once it’s done working.


My Favorite Variations for Extra Freshness

After experimenting for a while, I found a few variations that make this trick even better:

  1. Vinegar + Baking Soda: For stronger odors, place a bowl of vinegar next to a bowl of baking soda. The vinegar absorbs airborne smells while the baking soda traps them from surfaces.
  2. Vinegar + Citrus Peel: Drop a few orange or lemon peels in your vinegar bowl for a refreshing scent boost.
  3. Vinegar + Essential Oils: A few drops of peppermint or tea tree oil not only mask the vinegar scent but also add antibacterial benefits.

The Surprising Science Behind “Clean Air”

What amazed me most about this experiment wasn’t just how clean my kitchen smelled — it was how clean it actually was. Vinegar doesn’t just eliminate odors; it kills odor-causing bacteria and mold spores that linger in the air.

When I left that bowl out overnight, I wasn’t just deodorizing — I was purifying the air naturally, without filters, sprays, or electric gadgets.

It’s a small reminder that sometimes, the simplest natural remedies outperform even the most high-tech solutions.


The Long-Term Benefits

Using vinegar as an air cleanser has now become part of my weekly routine. Every few nights, especially after cooking or entertaining, I set out a small bowl before bed. By morning, my kitchen smells brand new — no artificial scents, no effort required.

I’ve also noticed that my kitchen doesn’t collect odors the way it used to. It’s like the air stays fresher for longer, probably because the vinegar helps prevent odor buildup at its source.


Final Thoughts

Who would’ve guessed that a humble bowl of vinegar could do what expensive air purifiers and sprays couldn’t?

After trying it myself, I can confidently say this simple trick really works. The science makes sense, the results are immediate, and it’s one of the easiest, most affordable ways to freshen your home naturally.

So the next time your kitchen smells like last night’s dinner — skip the scented candles and aerosol sprays. Pour a cup of vinegar into a bowl, leave it out overnight, and let nature do the rest.

You’ll wake up to a kitchen that smells as fresh as a new morning — no chemicals, no masking, just pure, clean air.

I Started Storing Onions and Potatoes Separately — And They Stopped Sprouting So Fast

I Started Storing Onions and Potatoes Separately — And They Stopped Sprouting So Fast

For years, I had a frustrating kitchen mystery. Every time I bought a bag of onions and potatoes, within just a couple of weeks, they’d start sprouting — green shoots poking out of the potatoes, and onions growing long stems like they were auditioning for a science experiment.

It didn’t matter whether I kept them in the pantry, in the fridge, or in a cute woven basket on my counter — the result was always the same. Half my veggies ended up wasted before I could even use them.

Then, one day, I stumbled across a small but eye-opening tip: “Never store onions and potatoes together.”

It sounded odd at first — after all, both are root vegetables that seem perfectly happy sharing the same basket. But out of curiosity (and mild frustration), I decided to try separating them.

A few weeks later, I was shocked — no sprouts, no mushy spots, and my onions stayed firm and flavorful. That simple switch completely changed how I handle my pantry produce. Here’s why separating onions and potatoes works so well — and how you can keep yours fresh for weeks longer too.


The Common Mistake: Storing Onions and Potatoes Together

Most people — myself included — tend to lump onions and potatoes together. They’re both hardy, inexpensive, and look great sitting side by side in a rustic kitchen basket. It feels logical to store them together because they both like cool, dark environments.

But here’s the catch: while their storage needs overlap, their chemistry doesn’t mix well.

When you store onions and potatoes together, they begin to interact in subtle but powerful ways — ones that speed up spoilage and sprouting on both sides.


The Science Behind the Sprouting

The reason onions and potatoes don’t make good pantry partners comes down to the gases and moisture they release.

1. Ethylene Gas: The Ripening Accelerator

Onions naturally produce a small amount of ethylene gas, a colorless plant hormone that helps trigger ripening and aging in produce. This is the same gas that makes apples ripen faster or bananas turn brown when stored near other fruits.

Potatoes, unfortunately, are very sensitive to ethylene. When exposed to it, they begin to sprout prematurely, turning soft and developing those unwanted green shoots.

2. Moisture: The Hidden Enemy

Potatoes, on the other hand, release moisture as they age. This extra humidity creates the perfect damp environment for onions to spoil. Onions prefer dry air — moisture makes them rot, grow mold, or become soft.

In short:

  • Onions make potatoes sprout.
  • Potatoes make onions rot.

So when they’re stored together, each one accelerates the other’s downfall.


The Simple Fix That Changed Everything

Once I learned that, I decided to rearrange my storage system. I gave onions and potatoes their own separate spaces — one on a shelf in the pantry, and the other in a dark corner under the counter.

Within just a few weeks, the difference was clear:

  • My potatoes stayed firm and sprout-free for nearly a month.
  • My onions remained dry, crisp, and mold-free.

I hadn’t realized that such a small change could extend their shelf life so dramatically.

And the best part? I stopped wasting money on spoiled produce.


The Right Way to Store Potatoes

Potatoes are hearty, but they still need the right environment to stay fresh. Here’s how to store them properly for maximum lifespan and flavor:

1. Keep them cool — but not cold

The best temperature range for potatoes is 45–50°F (7–10°C). That usually means a cool, dark pantry, basement, or cupboard away from your stove and sunlight.
Avoid the refrigerator — the cold converts potato starch into sugar, changing the taste and texture.

2. Store in a breathable container

Use a paper bag, burlap sack, basket, or ventilated bin. Potatoes need airflow to prevent moisture buildup and rot. Never keep them in plastic bags — they trap humidity and cause decay.

3. Keep them away from light

Light exposure triggers chlorophyll production, turning potatoes green and bitter. Cover them loosely with a towel or keep them in a dark corner.

4. Don’t wash before storing

Washing introduces moisture, which encourages mold and rot. Brush off dirt gently instead.

With these steps, I’ve found my potatoes can last 4 to 6 weeks without any sprouting or softness.


The Right Way to Store Onions

Onions are a bit more delicate than potatoes — they thrive in dry air and can quickly go bad if kept too close to moisture or in sealed containers. Here’s how to keep them perfect:

1. Choose the right location

Onions prefer a cool, dry, and well-ventilated spot — around 45–55°F (7–13°C). A wire basket, mesh bag, or even a pantyhose trick (yes, really!) works wonders.

You can hang onions individually in old pantyhose, tying knots between each one. This lets air circulate and prevents them from touching — no cross-contamination or rot.

2. Avoid closed bags or drawers

Onions need air to breathe. Plastic bags or tightly sealed drawers trap moisture, which quickly turns them mushy.

3. Keep them away from heat and sunlight

Heat encourages sprouting and drying out. Find a dark pantry or cupboard away from the oven or window.

4. Separate varieties

Sweet onions, like Vidalias, have higher water content and spoil faster. Use those first, and store yellow or red onions longer-term.

With proper storage, my onions now last up to two months without sprouting or soft spots.


Bonus Tip: What to Do With Sprouted Ones

Even with good storage, sometimes onions or potatoes might still sprout if you keep them long enough. But don’t toss them out just yet — here’s what you can do:

  • Slightly sprouted potatoes: You can still eat them if they’re firm and not green. Just cut off the sprouts before cooking.
  • Sprouted onions: They’re safe to eat if they haven’t gone soft or moldy. You can even plant them to grow fresh green onion shoots!

However, if your potatoes are green or bitter, that’s a sign of solanine — a natural toxin — and they should be discarded.


How to Store Other Produce Nearby (Without Causing Trouble)

Once I learned about ethylene gas and moisture issues, I started rethinking how I stored all my fruits and veggies. Some foods are “ethylene producers,” and others are “ethylene sensitive.” Mixing the two can cause early spoilage.

Here’s a quick guide to help you:

Keep These Away from Onions and Potatoes:

  • Apples
  • Bananas
  • Avocados
  • Pears
  • Tomatoes

All of these release ethylene, which can trigger faster sprouting and softening.

Safe Pantry Companions for Potatoes:

  • Garlic
  • Squash
  • Root vegetables like carrots or beets (as long as they’re dry)

Safe Companions for Onions:

  • Garlic (they actually get along surprisingly well)
  • Shallots

Creative Storage Ideas That Actually Work

Here are a few simple tricks that made my pantry organization both functional and stylish:

  1. Wire baskets or mesh drawers – They allow air circulation and look great in open shelving.
  2. Labelled bins – Keep your onions, potatoes, and garlic in separate bins with names for easy access.
  3. Hanging baskets – Save counter space and keep airflow constant.
  4. Cool drawer organizers – If you live in a hot climate, insulated drawers can mimic a cellar environment.

These setups aren’t just about looks — they truly help prevent premature spoilage.


The Surprising Side Benefit

One unexpected benefit I noticed after separating my onions and potatoes? My kitchen smelled fresher.

When onions and potatoes age together, they emit distinct earthy and sulfur-like smells that blend into something not-so-pleasant over time. By keeping them apart, the musty pantry odor vanished almost overnight.

It’s such a small detail, but it makes cooking and meal prep feel more enjoyable.


Why This Simple Change Matters

It’s amazing how one small adjustment can make such a big difference — not just in how long my produce lasts, but in how much money I save and how much less food I waste.

Every year, households throw away up to 30% of their fresh produce due to spoilage. Much of that could be avoided with better storage habits.

By simply separating onions and potatoes, you can:

  • Double their shelf life.
  • Reduce food waste.
  • Save money on groceries.
  • Keep your pantry cleaner and better organized.

Final Thoughts

It’s funny how such an old-fashioned tip — one your grandmother probably knew — can completely change the way you store food today.

When I stopped storing onions and potatoes together, I wasn’t expecting much. But now my pantry is neater, my vegetables last far longer, and I never have to deal with that funky smell or green-sprouting surprise.

So if you’ve been battling fast-sprouting potatoes and soft onions, give this simple separation trick a try. You’ll be amazed at how long your produce stays fresh — and how much less you’ll have to throw away.

Sometimes, the best kitchen hacks aren’t new at all — they’re just rediscovered.

I Used Rice to Save My Phone After It Got Wet — And Here’s What Really Happened

I Used Rice to Save My Phone After It Got Wet — And Here’s What Really Happened

It happened on a perfectly ordinary afternoon — I dropped my phone straight into a sink full of water. My heart sank with it. Like most people, my phone is practically glued to my hand — photos, messages, notes, passwords — everything is in there. Losing it wasn’t just inconvenient; it felt like losing a part of my life.

Panicked, I did what most of us would do: I Googled “what to do when your phone gets wet.” And sure enough, the most common advice popped up — put it in rice.

Everyone has heard this classic trick at least once. Supposedly, uncooked rice absorbs moisture and can rescue a water-damaged phone. With nothing to lose, I decided to try it. I grabbed a bag of rice, buried my phone in it like a treasure, and waited.

What happened next was not exactly what I expected. While rice did help in some ways, I learned a lot more about how water damage really works — and what actually saves a wet phone. Here’s what I discovered, step by step, and what I’d do differently next time.


The Moment of Panic: What I Did First

When I saw my phone sink under water, I instinctively pulled it out as fast as I could. It was only submerged for a few seconds, but even that can be enough to cause serious damage.

Here’s what I did — and what you should do if this ever happens to you:

  1. Immediately power it off.
    Don’t even try to see if it still works. Turning on a wet phone is one of the worst things you can do. Electricity and water don’t mix — it can short-circuit the internal components instantly.
  2. Remove everything you can.
    I took off the case, removed the SIM card, memory card, and wiped the surface with a towel. The idea is to eliminate as much external moisture as possible right away.
  3. Resist the urge to charge it.
    Even if your phone looks fine, plugging it in can cause permanent damage. Patience is key here.

That’s when I remembered the rice trick — and decided to put it to the test.


The Famous Rice Trick: Myth or Miracle?

So, I poured a bowl of uncooked white rice, placed my phone inside, and made sure it was completely covered. Then came the hardest part — waiting.

Most online advice suggests leaving it for at least 24 to 48 hours. I left it for two full days, resisting every urge to check it. When I finally took it out, I held my breath and powered it on.

To my relief, the screen lit up! The phone worked. The buttons responded, and the touch screen seemed fine. I was convinced the rice had saved my phone.

But a few days later, I noticed some strange issues — the speaker sounded muffled, and the charging port occasionally refused to connect. That’s when I learned that while rice might help, it isn’t the miracle fix it’s often made out to be.


What Rice Actually Does (and Doesn’t Do)

Rice is slightly absorbent — it can soak up some moisture from the air, but not nearly enough to pull water out of a device efficiently.

What Rice Does Well:

  • It can help draw surface moisture away from your phone.
  • It provides a dry environment for the device to rest in.
  • It gives you a reason to leave your phone alone for a while (which is actually a good thing).

What Rice Doesn’t Do:

  • It doesn’t reach the water trapped inside your phone’s tiny components.
  • It can’t dry out moisture under the screen or behind the circuitry.
  • It sometimes leaves rice dust or starch particles inside the ports — which can make things worse.

So, while rice didn’t completely fail me, it also didn’t fully save my phone. It simply slowed down the damage long enough for me to take better action.


What You Should Actually Do When Your Phone Gets Wet

If I could go back, I’d follow these steps instead — the proper way to rescue a wet phone.

1. Turn it off immediately.

This step is non-negotiable. Even a few seconds of running electricity through a damp circuit can destroy it permanently.

2. Remove external parts.

Take off any covers, SIM trays, and accessories. Gently pat the device dry with a soft towel or cloth — never shake it or blow air directly into ports.

3. Skip the rice — use silica gel instead.

You know those little packets labeled “Do Not Eat” that come with shoes, electronics, or snacks? Those are silica gel packets, and they’re far more effective at absorbing moisture than rice.

If you have several of them, place your phone and the packets together in an airtight container or ziplock bag. Leave it for 24–48 hours.

4. Try the “air-dry and patience” method.

If silica gel isn’t available, simply leave your phone in a warm, dry area (not under direct sunlight or near a heater). A fan blowing gently nearby can help. Let it rest for at least two days before turning it on.

5. If possible, seek professional help.

Many tech repair shops have special vacuum dryers designed to pull moisture out of devices safely. If your phone is valuable or recently bought, this is your best option.


What NOT to Do

Here are a few mistakes I almost made — and ones you should definitely avoid if your phone ever takes a dive:

  • Don’t use a hairdryer or oven. Heat can melt delicate components and seals inside your phone.
  • Don’t shake or tap the phone. This can push water deeper into the circuits.
  • Don’t plug it in or try to “test” it. Even if it looks fine on the outside, internal moisture can still cause short-circuiting.
  • Don’t use rice long-term. It’s better than nothing, but not ideal — think of it as a temporary measure, not a real fix.

What Actually Happened to My Phone

After a week, my phone was mostly functional — the touchscreen worked, the camera was clear, and the apps ran smoothly. But there were lingering side effects:

  • The charging port became unreliable, sometimes disconnecting during charging.
  • The speaker quality deteriorated, sounding crackly and distorted.
  • A faint fog appeared under the camera lens occasionally, showing moisture had been trapped inside.

In short, rice had helped my phone survive, but not fully recover. It was a partial success — enough to buy me time, but not enough to restore it to perfect condition.

Eventually, I took it to a repair shop. The technician confirmed what I suspected: rice doesn’t actually “dry out” the inner components completely. Some corrosion had already started forming on the circuit board.

It was a lesson learned — and one I’ll never forget.


Why Phones Don’t Like Water (Even When They’re “Water-Resistant”)

Many modern phones advertise themselves as water-resistant, but that doesn’t mean waterproof. Most are rated with an IP67 or IP68 certification — meaning they can handle splashes or brief submersion in clean water.

But the real world is messier — sinks, rain, pools, or coffee spills contain minerals, salts, and chemicals that water-resistance coatings can’t always protect against. Over time, these contaminants corrode metal parts and cause hidden damage.

So, even if your phone is “resistant,” it’s best to treat any liquid exposure seriously.


How to Prevent It Next Time

If this experience taught me anything, it’s that prevention is better than desperation. Here are some smart steps I now take to keep my phone safe from future mishaps:

  1. Use a waterproof case or pouch when near water.
  2. Keep silica gel packets handy for emergencies.
  3. Avoid using your phone near sinks, tubs, or pools.
  4. Invest in cloud backups so you never lose precious data if something goes wrong.

These small habits can save you from the stress (and cost) of dealing with water damage.


Final Thoughts

When I dropped my phone into water, I thought I’d lost it forever. The rice trick — though far from perfect — bought me some time and gave me hope. But through that experience, I learned that real phone rescue is about patience, proper drying, and prevention — not quick fixes.

If you’re ever in the same situation, remember this: don’t panic, don’t plug it in, and don’t rely solely on rice. Dry it properly, use silica gel if possible, and get it checked by a professional if it’s valuable.

Today, my phone still works (mostly), and I’ve since invested in a waterproof case. I still smile when I see that old bag of rice in the pantry — a reminder of the day I learned the hard truth behind one of the internet’s most famous DIY “fixes.”

I Added a Drop of Essential Oil to My Vacuum Bag — And My Whole Home Smelled Amazing

I Added a Drop of Essential Oil to My Vacuum Bag — And My Whole Home Smelled Amazing

Vacuuming has always been one of those necessary but uninspiring chores for me. Sure, it keeps the floors clean, but I never associated it with anything pleasant — until I stumbled upon a small but game-changing cleaning hack. One day, while scrolling through a home-care forum, I read that adding a drop of essential oil to your vacuum bag could transform your cleaning routine into an instant aromatherapy session.

Skeptical yet intrigued, I decided to give it a try. I grabbed my favorite essential oil, added just a drop to my vacuum bag, and started cleaning as usual. Within minutes, the entire room was filled with a light, refreshing scent — not overpowering, just naturally clean and calming.

That one tiny change completely redefined how I felt about vacuuming. What was once a boring chore suddenly became something I looked forward to. The fragrance lingered for hours, making my home smell like a luxury spa instead of a cleaning battlefield.

In this post, I’ll share exactly how this trick works, the best essential oils to use, and why this little tip might just become your favorite home fragrance secret too.


The Science Behind Why It Works

It might sound like magic, but there’s a simple explanation for why this hack works so well. When your vacuum runs, air flows continuously through the bag or filter system. Adding a drop or two of essential oil means that each time you vacuum, the air that’s expelled from the machine carries those aromatic molecules into the room.

Instead of releasing that familiar “dusty vacuum” smell, you get a gentle burst of natural fragrance that spreads evenly throughout your space. It’s like combining cleaning with aromatherapy — and the best part is, it costs almost nothing.

This trick works for both:

  • Vacuum cleaners with bags, by adding the oil directly onto the bag or a cotton ball inside.
  • Bagless vacuums, by placing a few drops on the filter or the dust container lining.

How to Add Essential Oils to Your Vacuum

It’s simple, fast, and surprisingly effective. Here’s how you can do it safely:

If You Have a Vacuum Bag:

  1. Remove the bag and open the section where air flows in.
  2. Add 2–3 drops of your favorite essential oil directly onto the bag’s interior or on a small cotton ball.
  3. Replace the bag and vacuum as usual.

As the vacuum runs, the fragrance will slowly release into the air, leaving behind a clean, pleasant scent that lasts for hours.

If You Have a Bagless Vacuum:

  1. Clean out the dust compartment first.
  2. Add a few drops of essential oil to a cotton ball and place it near the filter or inside the dust cup.
  3. Vacuum as normal and enjoy the fresh aroma as you clean.

Pro Tip: If you use essential oils regularly, refresh the scent each time you empty the vacuum bag or canister.


The Best Essential Oils for a Fresh-Smelling Home

Not all essential oils are created equal when it comes to cleaning or deodorizing. Some are known for their antibacterial properties, while others simply make your home smell inviting and calm. Here are a few top choices based on your goals:

1. Lemon — For a Fresh, Clean Scent

Lemon essential oil is bright, uplifting, and instantly makes any space feel cleaner. It also helps neutralize musty odors and is perfect for kitchens and living areas.

2. Lavender — For a Calming, Relaxing Aroma

Lavender is known for its soothing qualities. Using it while you vacuum can turn your cleaning session into a stress-relieving ritual, especially before bedtime.

3. Eucalyptus — For a Crisp, Energizing Boost

Eucalyptus has a fresh, spa-like scent that helps clear the airways and revitalize your senses. It’s perfect if you want your home to smell fresh and invigorating.

4. Peppermint — For an Invigorating Burst of Clean

Peppermint essential oil not only smells amazing but also helps deter pests like ants and spiders. It’s a great choice for entryways and corners.

5. Tea Tree — For a Naturally Antibacterial Clean

Tea tree oil helps purify the air and eliminate bacteria and odors. It’s an excellent option for homes with pets or high humidity.

6. Orange or Grapefruit — For an Energizing, Happy Home

These citrus oils create a cheerful, uplifting atmosphere while cutting through bad odors. Perfect for brightening up mornings or spring cleaning days.

You can even blend essential oils for a custom scent — for instance, lemon and lavender for freshness and calm, or eucalyptus and peppermint for a cool, refreshing aroma.


Why This Trick Beats Store-Bought Air Fresheners

Before trying this hack, I used to rely on plug-ins, sprays, and candles to make my home smell nice. But I found that most of them only mask odors temporarily — and many contain synthetic chemicals that can irritate allergies or contribute to indoor air pollution.

Here’s why using essential oils in your vacuum is a smarter choice:

  1. Natural and Non-Toxic
    Essential oils are derived from plants, not made from artificial fragrances. You get a clean scent without the harsh chemicals.
  2. Long-Lasting Effect
    As you vacuum, the air continually circulates through the scented bag, spreading fragrance throughout your space — not just where you spray.
  3. No Extra Cost
    You’re already vacuuming anyway, so adding a few drops of oil costs practically nothing but multiplies the benefits.
  4. Customizable Scents
    You can change the oil depending on the season or mood. Think cinnamon and orange for fall, peppermint for the holidays, or lavender for spring.
  5. Aromatherapy Benefits
    Beyond smelling good, essential oils can boost your mood, help reduce stress, and create a relaxing home atmosphere.

My Results After Trying It

After using essential oils in my vacuum for a few weeks, I noticed three major changes in my home:

1. My Home Smelled Fresh Instantly

Instead of a dusty, mechanical scent after vacuuming, I was greeted by a light wave of fragrance — not too strong, just enough to make the air feel clean. The scent lingered long after I finished cleaning, especially in carpeted rooms.

2. Odors Stayed Away Longer

Pet smells, cooking odors, and musty corners were noticeably reduced. The essential oils seemed to neutralize the odors rather than just cover them up.

3. Cleaning Became Enjoyable

This might sound funny, but I actually looked forward to vacuuming. The scent made me feel calmer and more productive, and cleaning no longer felt like a chore.


Safety Tips to Keep in Mind

While this is an easy and effective hack, there are a few precautions to ensure you do it safely:

  • Use only pure essential oils. Avoid synthetic fragrance oils that can leave residue or irritate allergies.
  • Don’t overdo it. Two or three drops are enough — too much oil can clog filters or create a strong, overwhelming scent.
  • Avoid oily buildup. If your vacuum has delicate filters, add the oil to a cotton ball instead of directly on the bag or filter.
  • Test new scents. Some oils (like cinnamon or clove) are very strong — start with one drop and see how you like it.
  • Check manufacturer guidelines. Make sure your vacuum’s warranty allows for fragrance use or maintenance changes.

Fun Ways to Customize Your Scent

Once I realized how much I loved this hack, I started experimenting with seasonal blends to match my home’s mood throughout the year:

  • Spring Refresh: Lemon + Lavender
  • Summer Vibes: Grapefruit + Eucalyptus
  • Autumn Comfort: Sweet Orange + Clove
  • Winter Warmth: Peppermint + Cedarwood

You can even make it a mini ritual — adding a few drops before each cleaning session to create a rotating scent experience for your home.


The Eco-Friendly Bonus

Beyond the amazing smell, this trick is surprisingly eco-friendly. Unlike aerosol sprays or synthetic air fresheners, essential oils are biodegradable and safe for the environment. You also avoid unnecessary packaging waste from store-bought fresheners.

Plus, because the oils last longer and you use just a few drops, one small bottle can keep your home smelling fresh for months.


Final Thoughts

Adding essential oils to your vacuum might seem like a tiny, almost silly idea — but it’s one of those small changes that make a huge difference in everyday life. With just a drop of oil, vacuuming becomes more than just cleaning; it turns into a moment of calm, freshness, and satisfaction.

Your floors get cleaner, your air smells better, and your mood lifts — all at once. It’s such an effortless upgrade that I now can’t imagine vacuuming without it.

If you’re looking for an easy, affordable, and natural way to make your home smell amazing, skip the expensive air fresheners and try this instead. One drop of your favorite essential oil is all it takes to make your entire house feel — and smell — brand new.

10 Expert Tips for Growing Pineapples Super Fast from Discarded Tops You Can’t Ignore!

10 Expert Tips for Growing Pineapples Super Fast from Discarded Tops You Can’t Ignore!

Pineapples are one of the most fascinating fruits to grow — and the best part? You can grow them for free from the discarded top of a store-bought fruit. Many gardeners toss away the leafy crown without realizing it’s the beginning of a new pineapple plant. With the right techniques, you can turn that scrap into a thriving tropical beauty that fruits faster than you’d expect. Inspired by the YouTube video “Tips For Growing Pineapple Super Fast From The Tops Discarded, Can’t Be Ignored”, this detailed guide will walk you through everything you need to know — from crown preparation to quick rooting and rapid growth secrets.


1. Why Grow Pineapples from Tops?

Growing pineapples from tops is not just economical but also incredibly rewarding. It’s the easiest propagation method that requires no special tools or seeds. Pineapple crowns naturally contain buds that can regrow roots and shoots under the right conditions.

Each pineapple you buy holds the potential for another — making it a sustainable way to enjoy homegrown fruit year after year. Plus, it’s fun to watch the transformation from discarded top to fruit-bearing plant!

The main challenge many gardeners face is speed — pineapples can take 18–24 months to produce fruit. However, with the right care and environment, you can significantly accelerate growth. The video shares valuable insights that help reduce that waiting time while ensuring a healthy, productive plant.


2. Step One: Choosing the Perfect Pineapple Top

The secret to growing pineapples fast starts with selecting the right top. Don’t just grab any old pineapple — look for one that’s fresh, firm, and healthy.

Choose a fruit with:

  • Bright green leaves with no brown tips.
  • A firm, mold-free crown.
  • A small, intact base beneath the leaves.

Avoid pineapples with wilted or dry tops — these are less likely to root quickly. Freshness is key because it ensures that the crown is still biologically active and ready to grow.

Once you’ve chosen your fruit, gently twist off the top instead of cutting it. Twisting keeps the base intact and exposes natural rooting tissue that promotes faster growth.


3. Preparing the Pineapple Top Properly

This step makes all the difference between success and rot. After removing the top:

  1. Strip away 5–6 of the lower leaves to expose about an inch of stem.
  2. You’ll notice small brown dots or “eyes” around the stem — these are root buds waiting to sprout.
  3. Allow the crown to dry for 2–3 days in a shaded area.

Drying the crown forms a callus over the cut area, preventing rot when planted. This simple step, often skipped by beginners, dramatically increases rooting speed and survival rate.


4. Rooting Pineapple Tops in Water for Faster Growth

One of the fastest ways to start your pineapple is by rooting it in water. This method helps you monitor root development and ensures the plant gets a quick start.

Here’s how it’s done:

  • Place the prepared crown in a glass of clean water, ensuring only the stem (not the leaves) is submerged.
  • Change the water every 2–3 days to keep it fresh.
  • Place the glass near a sunny window but away from harsh direct sunlight.

Within 7–10 days, you’ll see fine white roots emerging from the base. Once they’re about 2–3 inches long, your pineapple top is ready for soil.

At Queen Annie’s Place, and as shown in many successful grower demonstrations, this step is often credited for jumpstarting the plant’s growth — giving you a strong, rooted start before transplanting.


5. Choosing the Right Soil Mix for Rapid Growth

After rooting, the next crucial step is giving your pineapple the perfect growing medium. Pineapples love loose, well-draining soil that prevents waterlogging.

A proven fast-growth mix includes:

  • 1 part garden soil or loam
  • 1 part perlite or coarse sand
  • 1 part organic compost or coconut coir

This combination ensures excellent drainage while providing enough nutrients for strong root development. Pineapples don’t like “wet feet,” so good aeration is key to keeping roots healthy and active.

If you’re planting in containers, pick a 12–15 inch pot with multiple drainage holes. Container-grown pineapples tend to warm up faster, stimulating quicker root and leaf growth — another hidden trick for speed!


6. The Right Sunlight and Temperature Boost Growth Speed

Pineapples are tropical plants that thrive on sunlight. To grow super fast, they need 6–8 hours of direct sunlight each day.

Warmth plays a big role in how quickly your plant grows. Ideal temperature:

  • 70°F–95°F (21°C–35°C) during the day.
  • Never let temperatures drop below 60°F (16°C) for long periods.

If you live in a cooler climate, grow pineapples indoors near a bright south-facing window or under a grow light. The more warmth and light they receive, the faster they’ll develop.

Sunlight also triggers leaf growth, which feeds the plant’s energy production. Each new leaf that forms brings your plant closer to producing a flower — and eventually fruit.


7. Watering Smart: Avoid Overwatering Mistakes

Watering is one of the most critical aspects of growing pineapples quickly. While they love moisture, they can’t tolerate standing water.

Watering tips for rapid growth:

  • Keep the soil slightly moist but never soggy.
  • Water once or twice a week, depending on humidity and temperature.
  • Pour water into the center “cup” formed by the leaves — pineapples absorb moisture through both roots and leaves.
  • Mist the plant occasionally to boost humidity.

During cooler months, reduce watering frequency. Overwatering slows down root respiration and growth, leading to rot — one of the biggest obstacles to fast development.


8. Feeding Your Pineapple for Faster Fruiting

To grow your pineapple faster, you need to feed it regularly. The plant thrives on balanced nutrition that supports leaf production and root vigor.

For quick results:

  • Use a balanced liquid fertilizer (10-10-10) every 2–3 weeks.
  • Alternatively, feed monthly with compost tea or organic seaweed extract.
  • Spray diluted fertilizer directly on the leaves for better nutrient absorption.

Pineapples are bromeliads, and they absorb nutrients through their leaves as well as their roots — a tip often overlooked by gardeners. Feeding through the foliage helps the plant grow lush and strong in a shorter time.


9. Tricks to Encourage Early Flowering and Fruit Set

Even with fast growth, many gardeners wonder how to make their pineapples flower sooner. Normally, plants take up to two years to bloom, but there are natural ways to trigger earlier flowering.

Try this ethylene trick to stimulate blooming:

  1. Place a ripe apple beside the pineapple plant.
  2. Cover both with a clear plastic bag for 5–7 days.
  3. Ethylene gas released from the apple encourages the plant to flower.

You can also sprinkle a small pinch of calcium carbide into the plant’s center, then pour a bit of water over it. This releases acetylene gas, which has the same effect as ethylene. Within 2–3 months, your pineapple may start flowering.

When flowering begins, switch to a high-potassium fertilizer to promote fruit development and sweetness.


10. Ongoing Care and Common Mistakes to Avoid

Once your pineapple is growing fast and strong, consistent care keeps it on track for fruiting success.

Do’s:

  • Rotate the pot weekly for even sunlight.
  • Remove dead or dry leaves to keep the plant clean.
  • Protect from frost or cold drafts.
  • Propagate new plants from suckers and slips that form around the base.

Don’ts:

  • Don’t use heavy clay soil — it slows root expansion.
  • Don’t leave the crown wet before planting — it leads to rot.
  • Don’t neglect feeding — nutrient deficiency can delay fruiting by months.

By following these steps, you’ll maintain strong, active growth and reduce the waiting time between planting and harvest.


11. Patience with a Tropical Reward

Even when using fast-growth tricks, pineapples still require patience and care. Most gardeners see impressive leaf growth within 3–4 months and flowers within 12–16 months under ideal conditions. Once the flower blooms, the fruit matures in another 4–6 months.

The reward is worth it — a golden, juicy pineapple grown entirely from a discarded top! Nothing compares to the satisfaction of harvesting your own tropical fruit from something that would’ve gone to waste.


12. Final Thoughts: From Trash to Treasure

The YouTube video “Tips for Growing Pineapple Super Fast from the Tops Discarded, Can’t Be Ignored” reminds us how simple yet powerful nature can be. With a little knowledge and consistency, you can turn kitchen waste into a thriving, fruiting plant.

The keys to fast pineapple growth are a healthy start, well-draining soil, consistent warmth, balanced feeding, and adequate light. Combine these with the right rooting and care techniques, and you’ll be amazed at how quickly your pineapple flourishes.

So next time you enjoy a store-bought pineapple, don’t toss that crown — treat it as the beginning of your next gardening adventure. With these can’t-be-ignored tips, your pineapple will grow faster, stronger, and sweeter than you ever imagined.

The Ultimate Guide to Growing Pineapple at Queen Annie’s Place: A Tropical Delight from Your Own Garden

The Ultimate Guide to Growing Pineapple at Queen Annie’s Place: A Tropical Delight from Your Own Garden

Pineapples are one of the most fascinating tropical fruits you can grow at home — a symbol of warmth, hospitality, and sweet success in gardening. At Queen Annie’s Place, the art of growing pineapples is not just about cultivating fruit; it’s about nurturing patience, creating beauty, and connecting with nature in a truly rewarding way. In this comprehensive guide, inspired by the YouTube video “Growing Pineapple at Queen Annie’s Place!”, we’ll explore how to grow your own pineapple plants step by step, from crowns to harvest, and how to create the ideal environment for them to thrive.


1. The Charm of Pineapple Growing

Pineapples (Ananas comosus) belong to the bromeliad family and are native to South America, but their tropical flair makes them popular worldwide. They can be grown successfully in pots, gardens, or greenhouses — perfect for gardeners who love exotic fruit and want to enjoy a taste of the tropics at home.

At Queen Annie’s Place, growing pineapples isn’t just a gardening project — it’s a journey of discovery. Watching a pineapple plant grow from a simple leafy crown into a fruit-bearing plant is deeply satisfying. It’s slow-paced gardening at its finest, and the results are well worth the wait.


2. Starting with the Pineapple Crown

The easiest and most rewarding way to start growing pineapple is by using the crown from a store-bought or homegrown fruit. Here’s how it’s done at Queen Annie’s Place:

  1. Choose a healthy pineapple with firm green leaves and no signs of rot or pests.
  2. Twist or cut off the leafy top (crown) about an inch below the leaves. Remove a few of the lower leaves to expose the small root buds around the base.
  3. Allow the crown to dry for two to three days in a shaded, airy place. This helps prevent rot when it’s planted.
  4. Optional step – root in water: Some gardeners like to place the crown in a glass of water until roots begin to form. Others, like at Queen Annie’s Place, plant directly into soil for a more natural start.

Whether you root in water or soil, patience is key. Within a few weeks, you’ll see roots developing and new leaves emerging from the center — a sure sign your pineapple plant is settling in.


3. Choosing the Right Soil and Pot

Pineapples love well-draining, slightly acidic soil. A good mix to use is:

  • 1 part garden soil
  • 1 part coarse sand or perlite
  • 1 part organic compost

At Queen Annie’s Place, pineapples are often planted in medium to large containers with good drainage holes. Container growing has several advantages — you can move the plants to catch more sunlight, protect them from frost, and control the watering better.

For outdoor planting, make sure the area has plenty of sunlight (at least six hours a day) and good airflow. Pineapples can tolerate partial shade but grow and fruit best in bright, warm conditions.


4. Watering and Feeding Pineapples

Pineapple plants are drought-tolerant, but that doesn’t mean they like being neglected. The goal is consistent but moderate watering.

  • Water when the top inch of soil feels dry.
  • Avoid waterlogging — soggy soil leads to root rot.
  • During dry or hot weather, mist the leaves occasionally to increase humidity.

Pineapples also appreciate light feeding. At Queen Annie’s Place, they use organic fertilizers or compost tea every few weeks during the growing season. A balanced fertilizer (10-10-10 or 14-14-14) works well, but you can also use a slow-release type to make feeding easier.


5. Light, Temperature, and Care

Pineapples thrive in warm, sunny environments. Ideal temperatures range from 65°F to 95°F (18°C to 35°C). If you live in a cooler area, you can still grow pineapples indoors near a sunny window or in a greenhouse.

At Queen Annie’s Place, the pineapples receive abundant sunlight throughout the day, helping them develop strong leaves and vibrant colors. If you’re growing indoors, consider using a grow light to supplement natural light during winter months.


6. Growth Stages and Patience

Pineapple plants grow slowly — and that’s part of their charm. It usually takes 18 to 24 months for a plant to produce fruit. Here’s what to expect:

  • Months 1–6: Rooting and leaf growth.
  • Months 6–12: Leaf rosette expands, and the plant develops a sturdy base.
  • Months 12–18: The plant matures and may start showing signs of flowering.
  • Months 18–24: The flower transforms into a beautiful pineapple fruit.

At Queen Annie’s Place, each stage of growth is celebrated — from the first root sprout to the stunning bloom that precedes fruiting. The flower itself is a sight to behold, with shades of pink and purple gradually turning into the familiar golden fruit we all love.


7. Encouraging Flowering and Fruiting

If your pineapple plant seems mature but hasn’t started flowering, you can give it a gentle nudge. Gardeners at Queen Annie’s Place often use natural methods to encourage blooming. One popular technique is the ethylene trick:

  • Place a ripe apple next to the pineapple plant and cover both with a plastic bag for about a week.
  • The apple releases ethylene gas, which signals the pineapple that it’s time to flower.

Within two months, you may see the central stalk emerge with a cluster of tiny purple-blue flowers. These flowers later fuse together to form the pineapple fruit — one of nature’s most fascinating transformations.


8. Harvesting the Pineapple

Harvesting is the most exciting part of growing pineapples. The fruit is ready to pick when:

  • The skin turns golden-yellow.
  • The fruit gives off a sweet, tropical aroma.
  • The leaves on top are still green but easy to tug slightly.

At Queen Annie’s Place, pineapples are harvested carefully by twisting the fruit from the stalk or cutting it with a sharp knife. It’s best to enjoy them fresh — nothing beats the juicy sweetness of a homegrown pineapple straight from your garden.


9. Propagating New Pineapple Plants

Once you’ve grown one pineapple, it’s easy to grow more. Each mature plant produces several suckers or slips (baby plants) around the base or under the fruit. These can be removed and replanted to grow new pineapples.

At Queen Annie’s Place, this is how their pineapple garden keeps expanding — from one crown to many thriving plants over time. It’s a sustainable and enjoyable cycle of growth that rewards patient gardeners with a continuous supply of fruit and beauty.


10. Common Problems and How to Fix Them

Even though pineapples are hardy, they can face a few challenges:

  • Root Rot: Caused by overwatering. Always ensure good drainage.
  • Pest Issues: Mealybugs and scale insects sometimes appear. Use neem oil or insecticidal soap to manage them naturally.
  • Slow Growth: Can result from low light or poor soil. Move the plant to a sunnier spot and feed it regularly.

At Queen Annie’s Place, the focus is always on organic care — avoiding chemical sprays and encouraging natural solutions to keep the plants healthy and the environment safe.


11. The Beauty of Pineapple Gardening

Growing pineapples is not only about producing fruit — it’s about embracing a tropical lifestyle. Their spiky leaves and exotic form make them stunning ornamental plants for patios, balconies, and garden borders.

At Queen Annie’s Place, pineapples are often featured as part of a tropical-themed garden alongside bananas, papayas, and herbs. Their golden fruits gleam like gems among the greenery, adding a magical touch to the landscape.


12. Final Thoughts

The journey of growing pineapples at Queen Annie’s Place beautifully demonstrates that great rewards come with patience and care. From a humble crown to a full, golden fruit, the process is a celebration of life, growth, and connection to nature.

Whether you have a sprawling garden or just a sunny balcony, you too can grow pineapples with a little effort and a lot of love. With their resilience, beauty, and sweetness, pineapples truly are one of the most satisfying fruits to grow at home.

So, take inspiration from Queen Annie’s Place — start with a single crown, nurture it with sunlight and patience, and before long, you’ll be harvesting your own delicious tropical treasure.

How to Grow a Pineapple from Its Top — The Foolproof Guide to Growing Smooth Cayenne Pineapples at Home

How to Grow a Pineapple from Its Top — The Foolproof Guide to Growing Smooth Cayenne Pineapples at Home

Growing a pineapple from its top might sound like a fun science project, but it’s much more than that — it’s a rewarding gardening experience that brings a taste of the tropics right into your home. Inspired by the video “How to Grow a Pineapple from its Top! Works Every Time! Pineapple (Smooth Cayenne)”, this guide will show you exactly how to turn a store-bought pineapple into a thriving, fruit-bearing plant.

With a bit of patience and care, you can enjoy the lush, tropical foliage of the Smooth Cayenne pineapple variety and eventually harvest your own sweet, homegrown pineapples. Let’s dive into the complete process — from selecting the right fruit to rooting, transplanting, and caring for your pineapple plant.


Understanding the Smooth Cayenne Pineapple

Before we start, it’s important to know what makes the Smooth Cayenne variety special. This is the most popular pineapple grown commercially around the world. It’s known for:

  • Golden-yellow flesh with a perfect balance of sweetness and acidity.
  • Smooth, spineless leaves, making it easier to handle.
  • Medium to large fruits, typically 4–6 pounds each.
  • High juice content, ideal for fresh eating or juicing.

Because Smooth Cayenne is adaptable and relatively easy to root, it’s one of the best varieties to start your home pineapple-growing journey.


1. Choosing the Perfect Pineapple Top

Your success begins with selecting a healthy pineapple. When you’re at the market, look for these qualities:

  • Fresh, green leaves with no signs of yellowing or rot.
  • A firm body with golden-yellow skin (not overly soft).
  • No mold at the base of the crown.

Avoid fruits that are too ripe or have dried, brown leaf tips — those may not sprout well.

Once you’ve found the perfect one, it’s time to remove the top, also known as the crown, which will become your new pineapple plant.


2. Preparing the Pineapple Top

Step-by-Step Preparation:

  1. Twist or Cut the Top: Hold the pineapple firmly and twist off the leafy top. If it doesn’t twist easily, cut about an inch below the leaves.
  2. Remove Fruit Flesh: Carefully peel away any fruit remaining at the base of the crown. Leaving it can cause rot during rooting.
  3. Strip Lower Leaves: Pull off 5–8 rows of lower leaves to expose about an inch of the stem. You should see tiny root buds (brownish dots) — these will become roots.
  4. Dry the Crown: Place it in a dry, shady area for 2–3 days to allow the cut end to heal and form a callus. This step is crucial to prevent rotting once you start rooting.

3. Rooting the Pineapple Top in Water

Rooting in water is one of the easiest and most satisfying methods, especially for beginners.

Here’s how:

  • Fill a glass jar or cup with water, just enough to cover the exposed stem (not the leaves).
  • Use toothpicks or a narrow jar to suspend the crown so only the base is submerged.
  • Place the jar in a warm, bright spot — indirect sunlight is ideal.
  • Change the water every 2–3 days to keep it fresh.

In 2–4 weeks, you’ll see white roots emerging from the base. Once roots are around 2–3 inches long, your pineapple top is ready for planting.

(Tip: If you prefer, you can also root directly in soil, though water rooting makes it easier to monitor progress.)


4. Planting the Rooted Pineapple Top

Now that your pineapple top has a good root system, it’s time to transplant it into soil.

Container Requirements:

  • Choose a pot at least 10–12 inches deep and wide.
  • Ensure it has excellent drainage holes, as pineapples hate soggy roots.

Soil Mix:
Pineapples thrive in light, well-draining soil. A perfect mix would be:

  • 40% potting soil
  • 30% coarse sand or perlite
  • 30% compost or coco peat

This mimics the sandy, tropical conditions pineapples love.

Planting Steps:

  1. Fill the pot with your soil mix, leaving space at the top.
  2. Plant the pineapple crown deep enough to cover the base of the leaves (about an inch into the soil).
  3. Firm the soil around the stem to keep the plant upright.
  4. Water lightly to moisten the soil — not soak it.

Place the pot in a warm, sunny location with at least 6–8 hours of bright light daily.


5. Caring for Your Pineapple Plant

Pineapples are tropical plants that love warmth, light, and humidity. With the right care, your Smooth Cayenne pineapple will flourish and eventually reward you with fruit.

Temperature:
Maintain a temperature range between 70–85°F (21–29°C). Avoid exposing the plant to temperatures below 55°F (13°C).

Light:
Pineapples thrive in full sunlight. If you’re growing indoors, place the pot near a sunny window or under grow lights.

Watering:
Water deeply but infrequently. The soil should dry out slightly between watering sessions. Overwatering is a common mistake — always check that the top inch of soil is dry before watering again.

In hot weather, lightly mist the leaves to increase humidity. Pineapples also absorb some moisture through their leaves.

Fertilizing:
Feed your plant every 2–3 weeks during the growing season with a balanced liquid fertilizer (10-10-10) or organic compost tea.

Once the plant matures, switch to a phosphorus-rich fertilizer to encourage flowering and fruiting.


6. Transplanting Outdoors (Optional)

If you live in a warm climate (USDA Zones 10–12 or tropical areas), you can move your pineapple outdoors once it’s well-established.

Transplant Tips:

  • Choose a sunny, well-drained spot.
  • Space plants 3–4 feet apart if planting multiple pineapples.
  • Protect from strong winds, as the leaves can snap easily.

Outdoor pineapples often grow faster and larger than potted ones — but with care, both can yield beautiful fruit.


7. Patience: The Key to Growing Pineapples

One thing you must understand about pineapples — they take time. A Smooth Cayenne pineapple may take 18–24 months to produce fruit, depending on growing conditions.

During this time, continue to provide sunlight, warmth, and moderate watering. The plant will produce a rosette of long, spiky leaves first, followed by a flower stalk once it’s mature.


8. Inducing Flowering (If It Takes Too Long)

If your pineapple hasn’t flowered after 18 months, you can encourage blooming naturally using a simple trick:

The Ethylene Method:

  • Place the plant and a ripe apple inside a large, clear plastic bag.
  • Seal the bag loosely and leave it for 7–10 days.
  • The apple releases ethylene gas, which stimulates flowering in pineapples.

After 1–2 months, you should see a red or pink flower bud forming in the center of the plant. That’s the beginning of your fruit!


9. Fruit Development and Harvesting

Once your pineapple blooms, it takes about 5–7 months for the fruit to fully mature. During this stage, increase potassium levels in your fertilizer to improve fruit sweetness.

Signs of Ripeness:

  • The outer skin changes from green to golden-yellow.
  • The fruit emits a sweet fragrance.
  • The lower eyes (small scales) flatten out slightly.

Use a sharp knife to cut the fruit close to the base. Handle carefully — freshly harvested pineapples bruise easily.

After harvesting, the mother plant will produce suckers or side shoots near the base. These can be separated and replanted, allowing you to grow even more pineapples without starting from scratch.


10. Common Problems and Solutions

Yellowing Leaves:
Often due to overwatering or poor drainage. Let soil dry out and ensure pot has holes.

No Root Growth:
Crown may have rotted. Always dry the crown before planting.

Slow Growth:
Usually from insufficient sunlight or low temperatures. Move plant to a sunnier, warmer location.

Pests:
Watch for mealybugs or scale insects. Use neem oil spray weekly to keep them away.


11. Enjoying Your Homegrown Pineapple

There’s nothing quite like cutting into a pineapple you grew yourself. The aroma, the sweetness, and the satisfaction of nurturing it from a simple crown are unmatched.

Homegrown Smooth Cayenne pineapples are juicier and fresher than store-bought ones — perfect for smoothies, fruit salads, or simply enjoyed fresh.

Even after harvest, the plant keeps giving. The offsets or “pups” it produces can be replanted, giving you a continuous supply of pineapples year after year.


Final Thoughts

Growing a pineapple from its top truly works every time when done right. It’s a wonderful example of nature’s ability to regenerate — transforming kitchen scraps into living, fruit-bearing plants.

With the Smooth Cayenne pineapple, you not only enjoy a tropical plant that brightens your space but also gain the thrill of harvesting your own sweet, golden fruit. Whether you grow it on your balcony, terrace, or garden, this simple propagation method connects you to the joy of sustainable gardening — one pineapple at a time.

How to Grow Big, Sweet Orange-Flesh Melons in Hanging Plastic Bowls on Your Terrace

How to Grow Big, Sweet Orange-Flesh Melons in Hanging Plastic Bowls on Your Terrace

Growing melons doesn’t have to be limited to large gardens or farmlands. With some creativity, patience, and smart container gardening techniques, you can grow big, juicy, orange-flesh melons right on your terrace — even if you live in an apartment or urban home. Inspired by the video “Growing Melons Hanging Plastic Bowls on the Terrace – Big Fruit – Orange Flesh,” this article will guide you step by step through the fascinating process of growing productive melon vines in hanging containers.

If you’re ready to transform your terrace into a mini fruit paradise, here’s everything you need to know — from choosing the right melon variety and preparing the soil to watering, pruning, and harvesting ripe, aromatic fruits.


Why Grow Melons in Hanging Plastic Bowls?

Hanging melons might sound unusual, but this innovative method is gaining popularity among urban gardeners. The technique involves growing melon vines in large plastic hanging bowls or containers, allowing the vines to trail downward instead of spreading across the ground.

This system offers several benefits:

  • Space-saving: Perfect for small terraces and balconies.
  • Better air circulation: Reduces the risk of fungal diseases and rot.
  • Cleaner fruits: Melons don’t rest on the soil, keeping them blemish-free.
  • Aesthetic appeal: The hanging vines with growing fruits add beauty to your terrace.
  • Controlled environment: Easier to manage soil moisture, pests, and nutrients.

It’s a practical and visually stunning way to enjoy homegrown fruit even in limited spaces.


1. Choosing the Right Melon Variety

To grow melons successfully in hanging bowls, you’ll need to pick compact, fast-maturing varieties that perform well in containers. Orange-flesh melons, often called muskmelons or cantaloupes, are ideal because they produce medium-sized fruits and thrive in warm, sunny conditions.

Some recommended varieties include:

  • ‘Sugar Queen’ – Early-bearing, sweet, and suitable for pots.
  • ‘Minnesota Midget’ – Small fruits (1–2 pounds), perfect for containers.
  • ‘Golden Jenny’ – Compact vines with deep orange, aromatic flesh.
  • ‘Honey Rock’ – Reliable, flavorful, and adapts well to limited space.

Choose hybrid or disease-resistant types for consistent yield and healthier plants.


2. Selecting and Preparing Hanging Bowls

Your melon’s success depends largely on the container. Since melons need ample root space, choose large hanging plastic bowls that are at least 18–20 inches in diameter and 10–12 inches deep.

Container Setup:

  • Make sure each bowl has 4–6 drainage holes to prevent waterlogging.
  • Line the bottom with small pebbles or pieces of broken clay pots for better drainage.
  • Use sturdy metal chains or thick rope to support the weight of the soil, water, and growing fruit — each container can weigh up to 10–15 kg when mature fruits develop.

Soil Mix Recipe:
To ensure good aeration and nutrient supply, prepare a rich, well-draining mix:

  • 40% garden soil
  • 30% compost or aged cow manure
  • 20% coco peat or perlite for moisture control
  • 10% sand or vermicompost for added fertility

Mix a handful of bone meal or rock phosphate to promote root and fruit development.


3. Sowing and Germinating Melon Seeds

Melons are warm-season crops, so start sowing when daytime temperatures are consistently above 75°F (24°C).

Steps for Sowing:

  1. Soak melon seeds in warm water for 6–8 hours to improve germination.
  2. Fill small pots or trays with seed-starting mix and plant seeds 1 inch deep.
  3. Keep the soil slightly moist — not soggy — and maintain warmth around 80°F (27°C).
  4. Germination takes 5–7 days. Once seedlings have two true leaves, they’re ready for transplanting.

Transplanting:
Transfer one strong seedling per hanging bowl. Be careful not to disturb the delicate roots. Position the bowl in a spot that receives 6–8 hours of direct sunlight daily.


4. Providing the Ideal Growing Conditions

Light:
Sunlight is essential for sweetness and growth. Ensure your terrace receives maximum exposure to full sun. If sunlight is limited, consider using reflective sheets or mirrors to redirect light toward your plants.

Temperature:
Melons love warmth — ideal range: 75–90°F (24–32°C). Protect your plants from cold drafts and strong winds using transparent plastic sheets or windbreakers.

Humidity & Airflow:
Proper air movement prevents mold and encourages pollination. Avoid clustering too many bowls together; space them about 3–4 feet apart.


5. Watering and Feeding Your Melons

Watering:
Melons are thirsty plants, especially when fruits start forming. However, overwatering can cause root rot.

  • Water deeply every 2–3 days, allowing the top inch of soil to dry between sessions.
  • Use a watering can or drip system to deliver moisture directly to the roots.
  • During fruit ripening, slightly reduce watering to enhance sweetness and prevent cracking.

Feeding:
Melons are heavy feeders. Feed plants every 2 weeks using a liquid fertilizer or compost tea.

Recommended Fertilizer Routine:

  • Early growth: Balanced fertilizer (NPK 10-10-10).
  • Flowering stage: Add phosphorus-rich fertilizer to boost blooms.
  • Fruit development: Switch to potassium-rich feed (e.g., NPK 5-10-20) for better flavor.

Adding seaweed extract or fish emulsion once a month enhances overall plant vigor.


6. Supporting and Managing Hanging Vines

As the vines grow, they’ll begin to cascade down beautifully from the bowl. Gently guide them using soft ties or garden clips to prevent breakage.

For fruits that start developing, support them using cloth slings or mesh bags tied to the bowl or trellis. This prevents fruits from pulling on the vines due to weight and helps them grow evenly without deformities.

If you have a terrace railing or pergola, you can let the vines trail horizontally for extra support.


7. Pollination Tips

One common challenge in terrace melon gardening is pollination, especially if there are few pollinators around.

Manual Pollination Steps:

  1. Identify male flowers (with thin stems) and female flowers (with small round fruits behind petals).
  2. In the morning, pluck a male flower and gently brush its pollen onto the center of the female flower.
  3. You can use a soft paintbrush instead of direct contact for cleaner pollination.

This ensures better fruit set and uniform growth, especially when growing indoors or on high-rise terraces.


8. Pruning and Growth Management

Pruning is essential for controlling growth and improving fruit size.

  • Once vines reach 4–5 feet, pinch off the growing tips to encourage side shoots.
  • Retain only 2–3 strong vines per plant.
  • Remove yellow or dead leaves regularly to improve airflow.

Pruning redirects the plant’s energy toward fruit production, resulting in bigger, sweeter melons.


9. Protecting Against Pests and Diseases

Even in containers, melon plants can attract aphids, whiteflies, and fungal infections.

Natural Remedies:

  • Spray neem oil (5 ml per liter of water) weekly to repel insects.
  • Use garlic or chili spray as a natural deterrent.
  • Keep leaves dry during watering to avoid powdery mildew.
  • Rotate your hanging bowls every season to reduce soil-borne disease buildup.

Good hygiene, airflow, and sunlight are your best defenses against terrace garden pests.


10. Harvesting Big, Sweet Orange-Flesh Melons

After about 80–100 days, your orange-flesh melons will be ready to harvest.

Signs of Ripeness:

  • The fruit emits a sweet, musky aroma.
  • The rind changes from green to golden or cream-colored.
  • The stem begins to crack slightly where it attaches to the fruit.
  • When tapped, the melon gives a dull, hollow sound.

Use scissors or pruning shears to cut the fruit from the vine, leaving a small stem attached. Handle carefully to avoid bruising.

Store ripe melons in a cool, dry place or refrigerate them to extend freshness. The taste is rich, aromatic, and deeply satisfying — all from your own terrace!


11. Seasonal Care and Continuous Production

To enjoy melons throughout the year, stagger your plantings every 3–4 weeks. In cooler seasons, cover your terrace setup with transparent greenhouse film to maintain warmth.

After harvesting, refresh the soil with new compost and organic matter before replanting. This maintains fertility and prevents nutrient exhaustion.


Final Thoughts

Growing big, orange-flesh melons in hanging plastic bowls is not only possible — it’s surprisingly productive and beautiful. The cascading green vines with glowing orange fruits create a tropical look on your terrace, while providing you with delicious, homegrown melons.

By following the simple principles from “Growing Melons Hanging Plastic Bowls on the Terrace – Big Fruit – Orange Flesh,” you can turn even a small urban balcony into a thriving fruit garden. With just sunlight, care, and a bit of love, you’ll soon be enjoying the sweetness of your very own terrace-grown melons — fresh, juicy, and straight from the vine.

Mastering Honeydew Melon Cultivation: How to Grow Sweet, Juicy Melons Inside the Greenhouse

Mastering Honeydew Melon Cultivation: How to Grow Sweet, Juicy Melons Inside the Greenhouse

Growing honeydew melons inside a greenhouse is one of the most rewarding gardening experiences for home growers and horticulture enthusiasts alike. With their sweet, refreshing flavor and smooth pale-green flesh, honeydew melons are a summertime favorite — and when grown under controlled greenhouse conditions, you can achieve high yields and consistent quality.

In this guide, inspired by “TLE Horticulture Growing Honeydew Melon Inside the Greenhouse,” we’ll explore every stage of honeydew melon cultivation — from seed selection and soil preparation to pollination, pest control, and harvesting — ensuring you have all the knowledge needed to grow your own delicious melons.


Understanding Honeydew Melons

Honeydew melons (Cucumis melo var. inodorus) belong to the muskmelon family, sharing similarities with cantaloupes but featuring a smooth, waxy rind and pale green flesh. They thrive in warm, sunny climates but are sensitive to sudden temperature changes and excessive moisture. That’s why greenhouse growing offers a perfect environment — protecting them from harsh weather, pests, and inconsistent watering.

Greenhouses create the ideal microclimate that melons need: steady warmth, balanced humidity, and ample light. This controlled setup results in sweeter fruits, faster growth, and fewer issues compared to open-field cultivation.


1. Choosing the Right Variety

Selecting a high-quality hybrid or heirloom variety suited for greenhouse growth is key. Look for compact, disease-resistant types such as:

  • ‘Earlisweet’ – early-maturing and known for its rich flavor.
  • ‘Honey Brew’ – excellent sweetness and high productivity.
  • ‘Arava’ – a popular Galia-type hybrid that performs well under greenhouse conditions.
  • ‘Temptation’ – produces smooth, uniform fruits ideal for small spaces.

When purchasing seeds, choose those labeled for greenhouse or controlled environment use, as they adapt better to limited space and artificial pollination methods.


2. Soil Preparation and Bed Setup

Honeydew melons prefer well-draining, fertile soil rich in organic matter. Inside a greenhouse, raised beds or large grow bags work best because they prevent waterlogging and improve aeration.

Ideal Soil Mix:

  • 40% loam or sandy loam soil
  • 30% compost or aged manure
  • 20% coco peat or perlite for aeration
  • 10% vermicompost for nutrient boost

Maintain a soil pH of 6.0–6.8 for optimal nutrient uptake. Before planting, mix in a slow-release organic fertilizer rich in phosphorus and potassium to encourage strong root growth and flowering.


3. Sowing and Germination

Start your seeds indoors or directly in the greenhouse about 4–6 weeks before transplanting.

Steps:

  1. Sow 2–3 seeds per cell in seed trays or biodegradable pots, about 1 inch deep.
  2. Keep the temperature around 75–85°F (24–29°C) for rapid germination.
  3. Water lightly and ensure good air circulation to prevent fungal diseases.
  4. Once seedlings develop two true leaves, thin them to one healthy plant per pot.

Transplant seedlings into their final greenhouse beds when they’re about 3–4 weeks old and the soil is warm (above 70°F).


4. Greenhouse Conditions and Temperature Control

Honeydew melons love warmth and light. Inside the greenhouse, aim for:

  • Daytime temperature: 80–90°F (27–32°C)
  • Nighttime temperature: 65–70°F (18–21°C)
  • Humidity: 60–70%

Install shade nets or reflective film during peak summer to prevent overheating, and use ventilation fans to maintain consistent airflow. A balanced environment minimizes diseases like powdery mildew and supports uniform fruit development.


5. Training and Pruning

Melons naturally sprawl, but in greenhouse cultivation, vertical trellising helps maximize space and improve air circulation.

Training Tips:

  • Use nylon or jute strings tied to the greenhouse frame for vine support.
  • As vines grow, gently twist them around the string or clip them at intervals.
  • Remove lateral shoots below the fifth node to encourage strong upward growth.

Once fruits start forming, prune excessive leaves to expose melons to filtered sunlight — this helps them ripen evenly and enhances sweetness.


6. Pollination Techniques

Since bees may not be as active inside a greenhouse, hand pollination ensures fruit set.

How to do it:

  • Identify male flowers (with thin stems) and female flowers (with tiny fruit behind the petals).
  • In the morning, gently transfer pollen from the male flower to the female flower using a small brush or by touching the blooms directly.
  • Mark pollinated flowers with ribbons to track fruit development.

Alternatively, you can introduce small hives of bumblebees for natural pollination if growing at a commercial scale.


7. Watering and Fertilization

Consistent watering is essential — melons require moist but not soggy soil. Use a drip irrigation system to deliver even moisture directly to the roots. Avoid overhead watering, which can promote disease.

Watering Tips:

  • Water deeply 2–3 times a week during the early growth phase.
  • Reduce watering slightly once fruits start developing to concentrate sugars and improve flavor.

Fertilization Schedule:

  • Before flowering: Apply a balanced NPK (10-10-10) every two weeks.
  • During fruit set: Switch to a high-potassium fertilizer (5-10-20) to boost fruit quality.
  • Add liquid seaweed or compost tea monthly to enhance soil microbiology and nutrient uptake.

8. Pest and Disease Management

Even in greenhouses, melons can face challenges like aphids, whiteflies, spider mites, and fungal diseases.

Prevention and Control:

  • Introduce beneficial insects like ladybugs to control aphids naturally.
  • Use neem oil or insecticidal soap weekly as a preventive measure.
  • Keep humidity under control to avoid powdery mildew and downy mildew.
  • Remove infected leaves immediately and maintain good air movement inside the structure.

Regular monitoring and early intervention help maintain healthy plants and reduce chemical dependence.


9. Harvesting Honeydew Melons

Honeydew melons are typically ready for harvest 90–110 days after planting. Recognizing the right harvest time is key to achieving peak sweetness.

Signs of Ripeness:

  • Skin color changes from green to creamy yellow.
  • The blossom end becomes slightly soft to touch.
  • A sweet, musky aroma develops.
  • When tapped, the melon produces a dull, hollow sound.

Cut the fruit from the vine using sharp pruning shears, leaving a small portion of the stem attached. Handle melons gently to prevent bruising and store them in a cool, dry place for up to two weeks.


10. Post-Harvest Tips and Yield Improvement

To increase yield and fruit quality in subsequent cycles:

  • Rotate crops with leafy greens or legumes to rejuvenate soil fertility.
  • Solarize the soil between crops to reduce pathogens.
  • Use compost-enriched mulches to retain moisture and maintain soil health.
  • Regularly prune older vines and replace them with new seedlings to keep the production continuous.

By fine-tuning your greenhouse environment and following a structured care routine, you can enjoy multiple harvests per year with superior fruit quality.


Final Thoughts

Growing honeydew melons inside a greenhouse allows you to experience the joy of harvesting sweet, aromatic fruits regardless of outdoor weather. With careful attention to temperature, humidity, and pollination, even small-scale gardeners can achieve professional-quality yields.

By applying the methods demonstrated in “TLE Horticulture Growing Honeydew Melon Inside the Greenhouse,” you’ll discover that a bit of effort and precision can lead to plump, sugary melons that rival any store-bought variety. Whether you’re cultivating for personal enjoyment or small-scale sale, this controlled approach guarantees consistent, rewarding results year after year.