
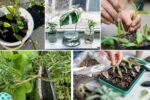
Moving plants from one place to another — whether it’s from pot to ground, ground to container, or one garden bed to another — can be a nerve-wracking task for both plants and gardeners. Transplanting is a vital part of gardening, helping you refresh your landscape, adjust crowded beds, or rescue plants from poor conditions. But if done carelessly, it can shock plants, stunt their growth, or even kill them.
The good news? With a little preparation and the right techniques, you can transplant plants without stress and set them up for healthy, thriving new beginnings. In this guide, we’ll cover 10 smart, easy-to-follow tips for stress-free plant transplanting, along with expert advice to help your plants bounce back quickly and flourish.
Why Plants Get Stressed During Transplanting
Before we jump into solutions, it’s helpful to understand what happens during transplanting. Plants rely on a complex network of fine, hair-like roots to absorb water and nutrients. When you move a plant, some of these roots inevitably get disturbed or broken, affecting the plant’s ability to feed itself.
Signs of transplant shock include:
- Wilting or drooping leaves
- Yellowing foliage
- Slowed or halted growth
- Dropped flowers or buds
- Brown leaf tips
The goal of transplanting properly is to minimize this stress and help your plants quickly adjust to their new environment.
10 Proven Tips to Transplant Plants Without Stress
Let’s dive into the step-by-step tips to give your plants the smoothest move possible:


1. Choose the Right Time
Timing is everything when it comes to transplanting. Avoid moving plants during the heat of the day or the peak of summer. The best time to transplant is during the cooler parts of the day — early morning or late afternoon — and ideally during the plant’s dormant or slower-growing season (spring or fall for most plants).
Why it works:
Cooler temperatures reduce water loss from leaves and minimize stress on roots.
2. Prepare the New Location First
Before you start digging up your plant, make sure the new spot is ready to receive it. Dig the planting hole or prepare the new container in advance, so the plant spends as little time as possible with its roots exposed.
How to do it:
- Dig a hole twice as wide and the same depth as the plant’s root ball.
- Loosen the soil at the bottom for easy root penetration.
- If using a container, choose one slightly larger than the current pot and fill it with quality, well-draining soil.

3 Water Thoroughly Before Transplanting
Give your plant a deep drink of water a day or a few hours before transplanting. Well-hydrated roots are more resilient and less prone to damage.
Tip:
Avoid transplanting dry plants — dry roots are brittle and can snap easily.

4. Handle Roots Gently
When lifting the plant, dig a generous perimeter around the root zone and try to keep as much soil attached to the roots as possible. Avoid tugging or pulling on the stems or foliage.
For potted plants:
Gently tap or squeeze the sides of the pot to loosen the root ball and ease the plant out.
Important:
If you see circling or bound roots in containers, gently tease them loose or trim the outer ring to encourage outward growth.
5. Trim Damaged Roots and Leaves
After lifting the plant, inspect the roots and snip off any broken, rotten, or overly long roots using clean, sharp scissors or pruners. Also, remove any dead or damaged leaves to reduce water loss and help the plant focus its energy on recovery.
Why it helps:
Healthy roots regrow quickly, and trimming reduces plant stress by balancing root loss with foliage demands.
6. Plant at the Same Depth
Always transplant your plant so that it sits at the same depth in its new home as it did in its previous spot. Planting too deep can suffocate the roots, while planting too shallow can expose them to air and sun damage.
Tip:
Use the soil mark on the stem as a guide for planting depth.
7. Backfill with Quality Soil
Use rich, well-draining soil to backfill the hole or container. Gently tamp the soil around the roots, removing large air pockets, but avoid packing it too tightly.
Enhance the soil by adding:
- A handful of compost for nutrients
- Organic mulch to retain moisture
- A light sprinkle of organic fertilizer (if appropriate)
8. Water Immediately After Transplanting
Give your plant a good, deep watering right after transplanting to help settle the soil around the roots and eliminate air gaps. This helps reduce immediate stress and ensures the roots have access to moisture.
Bonus tip:
Add a weak seaweed or liquid plant tonic to the water to boost root growth and reduce shock.
9. Provide Shade and Shelter
If possible, protect newly transplanted plants from direct sun, wind, or harsh rain for a few days. You can use shade cloth, garden umbrellas, or even a cardboard box to offer temporary shelter.
Why it works:
This reduces water loss through transpiration and gives the plant time to adjust.
10. Monitor and Mulch
Keep an eye on your transplanted plant over the next couple of weeks. Check soil moisture regularly and avoid overwatering, as soggy soil can lead to root rot. A layer of mulch around the base helps regulate soil temperature and moisture.
Ideal mulches include:
- Bark chips
- Straw
- Shredded leaves
- Coco coir
Avoid piling mulch against the stem or crown, which can trap moisture and cause rot.
Bonus: Signs Your Plant Is Settling In
After transplanting, it might take a week or two for your plant to perk up. Signs it’s adjusting well include:
- New leaf growth
- Firm, upright stems
- Return of healthy green color
- Gradual flowering (for blooming plants)
Common Mistakes to Avoid
- Transplanting in full sun on a hot day
- Moving dry plants
- Breaking too many roots
- Planting too deep or too shallow
- Forgetting to water immediately after transplanting
- Skipping soil enrichment
Final Thoughts
Transplanting doesn’t have to be a stressful experience for you or your plants. By following these 10 thoughtful tips, you can minimize transplant shock, promote healthy root growth, and give your plants a great start in their new home.
The key is patience, preparation, and a little TLC. Whether you’re moving a potted houseplant, refreshing your flowerbeds, or rescuing a garden favorite, these simple steps will help ensure your plants continue to thrive and beautify your space.